
Best Ever Greek Pita
As the days get shorter and the air turns crisp, there’s something undeniably comforting about a warm, freshly baked pita bread. Picture this: the scent of golden-brown dough sizzling away in a cast-iron pan, filling your kitchen with a cozy aroma that embraces you like a favorite sweater. My heart swells with nostalgia as I recall the vibrant street markets of Greece, bustling with laughter and the sound of sizzling pans, where each bite of fluffy pita transported me back to simpler times.
This recipe for Best Ever Greek Pita is not only incredibly simple but also a wonderful centerpiece for an easy weeknight dinner or a weekend gathering with friends. Whether you’re wrapping up grilled meats, stuffing them with fresh veggies, or dipping them into creamy tzatziki, these pitas will surely shine. This is one you’ll definitely want to pin for later!
Why You’ll Love This Recipe
- Quick and Easy: This Best Ever Greek Pita recipe takes just a little time to prepare and is achievable for even beginner bakers.
- Fluffy and Tender: Each pita puffs up beautifully on the stovetop, making them perfect for scooping up your favorite dips and spreads.
- Versatile: These pitas can be enjoyed with a variety of fillings, from savory to sweet, making them suitable for any occasion.
- Homemade Goodness: There’s nothing like the satisfaction of creating your own bread from scratch, filling your home with warmth and love.
- Family-Friendly: Get the kids involved in the rolling and stuffing process—it’s a wonderful way to bond over food!
What You’ll Need
Gather these simple ingredients to create your Best Ever Greek Pita:
- 1 ½ cups all-purpose flour (plus more for the surface)
- 1 tablespoon active dry yeast
- 1 teaspoon kosher salt
- ⅓ cup warm milk
- ⅓ cup warm water
- 2 tablespoons olive oil (plus more for the bowl and cooking)
How to Make Best Ever Greek Pita
Let’s make it together! Follow these simple steps to create fluffy, golden pitas:
- In a large bowl, combine the flour, yeast, and salt, and mix to combine.
- Add the warm milk and water, mixing until well incorporated.
- Lastly, add the olive oil, kneading the dough in the bowl for a few minutes until it forms a cohesive ball.
- Brush or rub some olive oil in a clean bowl, and place the dough inside. Cover with plastic wrap and let it rest for an hour until it rises and doubles in size.
- Once doubled, dust your surface with flour. Remove the dough from the bowl and cut it into 8 equal-sized pieces.
- Using your hands, gently stretch each piece of dough into a circle. Roll it out to about a ¼-inch thick circle using a rolling pin.
- Carefully stretch and roll each piece to about 7–8 inches wide.
- Heat a cast-iron pan over high heat, adding 1 teaspoon of olive oil. Cook one stretched pita in the pan for about a minute. Drizzle a little oil on top, flip, and cook for another minute on the other side.
- Once all pitas are cooked, feel free to drizzle some melted garlic and herb butter on top for an extra delicious touch (optional).
Delicious Variations to Try
Looking to take your pitas up a notch? Here are a few creative twists you can explore:
- Herbed Pita: Mix in some dried herbs like oregano or thyme into the dough for a subtle, aromatic flavor.
- Stuffed Pitas: After baking, fill your pitas with creamy hummus, crisp lettuce, and grilled veggies for a zesty lunch.
- Sweet Pita: For a delightful dessert, sprinkle the dough with cinnamon and sugar before rolling, then serve with a side of honey.
- Savory Add-Ins: Incorporate sun-dried tomatoes or feta cheese into your dough for a rich, savory flavor boost.
Chef Emma’s Helpful Tips
To ensure your pita bread comes out perfectly every time, consider these helpful tips:
- Make Ahead: The dough can be prepared in advance; just refrigerate it in an airtight container for up to 24 hours before cooking.
- Room Temperature Ingredients: Ensure your milk and water are warm, not hot, to properly activate the yeast.
- Cooking Surface: Use a hot, dry cast-iron skillet to achieve that ideal puff and layered texture.
- Storage Suggestions: Store any leftover pitas in an airtight container or zip-top bag at room temperature for up to two days. They can also be frozen for up to three months—just reheat in a skillet or toaster for best results!
What’s Inside – Nutrition Breakdown
For those keeping an eye on nutrition, here’s a quick overview:
- Serving Size: 1 pita
- Calories: 150
- Carbohydrates: 28g
- Sugar: 0g
- Fat: 3g
- Protein: 4g
- Sodium: 160mg
Frequently Asked Questions
Can I make this ahead?
Absolutely! Prepare the dough ahead of time and refrigerate it until you’re ready to bake.
Can I use different ingredients?
Yes! Feel free to substitute whole wheat flour for a healthier alternative or almond milk for a dairy-free version.
How do I store leftovers?
Store your pita bread in an airtight container at room temperature for up to two days. For longer storage, freeze them!
How long does it last?
Homemade pita bread tastes best fresh, but if stored properly, it will last for about 2-3 days at room temperature.
Wrapping It Up
Baking your own pita bread is a joyful experience that fills your home with warmth and love. These Best Ever Greek Pitas are not just versatile and fluffy, they’re a delightful way to bring everyone together at the table. Enjoy them hot from the pan, filled with your favorite fillings, or simply savored on their own.
Save this Best Ever Greek Pita recipe to your cozy recipe board so it’s ready when you need a comforting treat! Happy baking!
Print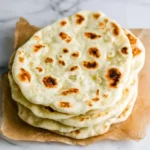
Best Ever Greek Pita
- Total Time: 25 minutes
- Yield: 8 servings 1x
- Diet: Vegetarian
Description
Warm, fluffy, and versatile, these Greek pitas are perfect for filling or dipping.
Ingredients
- 1 ½ cups all-purpose flour (plus more for the surface)
- 1 tablespoon active dry yeast
- 1 teaspoon kosher salt
- ⅓ cup warm milk
- ⅓ cup warm water
- 2 tablespoons olive oil (plus more for the bowl and cooking)
Instructions
- In a large bowl, combine the flour, yeast, and salt, and mix to combine.
- Add the warm milk and water, mixing until well incorporated.
- Lastly, add the olive oil, kneading the dough in the bowl for a few minutes until it forms a cohesive ball.
- Brush or rub some olive oil in a clean bowl, and place the dough inside. Cover with plastic wrap and let it rest for an hour until it rises and doubles in size.
- Once doubled, dust your surface with flour. Remove the dough from the bowl and cut it into 8 equal-sized pieces.
- Using your hands, gently stretch each piece of dough into a circle. Roll it out to about a ¼-inch thick circle using a rolling pin.
- Carefully stretch and roll each piece to about 7–8 inches wide.
- Heat a cast-iron pan over high heat, adding 1 teaspoon of olive oil. Cook one stretched pita in the pan for about a minute. Drizzle a little oil on top, flip, and cook for another minute on the other side.
- Once all pitas are cooked, feel free to drizzle some melted garlic and herb butter on top for an extra delicious touch (optional).
Notes
For added flavor, mix in dried herbs or stuff the pitas with your favorite fillings.
- Prep Time: 15 minutes
- Cook Time: 10 minutes
- Category: Bread
- Method: Cooking
- Cuisine: Greek
Nutrition
- Serving Size: 1 pita
- Calories: 150
- Sugar: 0g
- Sodium: 160mg
- Fat: 3g
- Saturated Fat: 0.5g
- Unsaturated Fat: 2.5g
- Trans Fat: 0g
- Carbohydrates: 28g
- Fiber: 1g
- Protein: 4g
- Cholesterol: 0mg